The satisfaction in it arises when you lift the mould out of the chaotic maelstrom of papermaking pieces and particles in the water. The water runs through the mesh and the particles settle flat, sucked down as the water runs through. All that chaos becomes a settled, fixed, unique creation.
Strictly, this is recycled paper. Rip up some ordinary paper into small squares. We used the sheets discarded from our inkjet printer over time. Cover with water and leave to soak overnight. Then run the soaked paper pieces through a blender to make a pulp.
Separately soak each of the other ingredients you will include in your paper. These might be: coloured paper, tissues, pictures or words on small pieces of paper, pieces of dried grass, dried leaves, whatever. (You may or may not wish to run these other ingredients through a blender; it depends how big you want them to be, and how much blended into the paper.)
Drop a few handfuls of the paper pulp into a tub of water along with any other ingredients you wish to appear in the finished paper. We used pieces torn from a colour magazine.
For this next stage you need a frame with gauze stretched over and fixed, called the mould, and a frame the same size with no gauze (this is called the deckle). You can buy these (here) or make your own mould and deckle using two empty picture frames.
Bought moulds and deckles: one mould fixed with gauze, the other with perforated zinc.
Stir up the pulp and water mixture. Holding the frame and deckle together, plunge them into the mixture and bring them up horizontal, letting the water run through, and leaving a layer of pulp on top of the gauze.
Lifting out the mould and deckle with a layer of pulp on it.
Lift off the deckle. Turn over the frame with the pulp on it and lay it on top of a wet cloth (we used J-cloths) - this is called the couching cloth.
Lifting off the deckle.
Laying the pulp and mould down on the cloths.
Press a little and lift slowly from one edge, leaving the pulp behind on top of the cloth. Cover this with another wet cloth ready for the next layer of pulp from the mould. Continue like this.
Lightly press the pulp onto the cloths.
Lift the mould away.
Press the pile of cloths and pulp layers to squeeze the water out.
We pressed the paper under a pile of bricks..
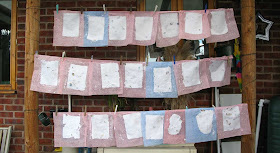
Remove the pile of cloths and paper pulp from the press and hang to dry.
Peel paper from cloth when dry.
Three sheets of finished paper.

This is a delightful papermaking book which, in addition to colour photos of everything and good simple papermaking instructions, tells you how to scent and colour your paper and make useful items from it. The methods described in the book are pretty much the same as we used in Making paper, Part 1, but with more detail given about each stage.
Making paper. Part 2


No comments:
Post a Comment